
The Link Between Oral Health and Overall Health: What the Evidence Actually Shows
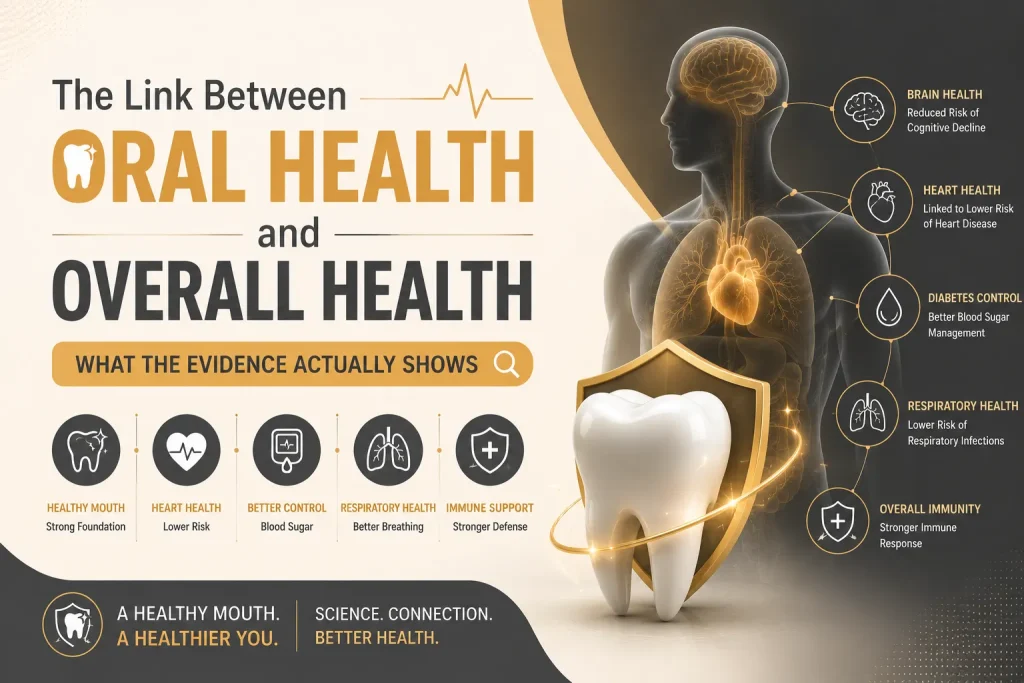
The mouth is not a sealed compartment. Bacteria from periodontal disease enter the bloodstream through inflamed gum tissue, and the immune response to chronic periodontal infection produces inflammatory signals that circulate well beyond the oral cavity. The connections between gum disease and cardiovascular disease, diabetes, pregnancy outcomes, Alzheimer’s disease, and respiratory infections are documented in peer-reviewed research. The strength of that evidence varies by condition. What doesn’t vary is the underlying physiology: a significant untreated periodontal infection is a systemic event, not a local one. This piece covers what the evidence actually shows for each connection, including where causality is established, where the research is associative, and what the clinical implications are for patients managing the conditions involved. How Oral Bacteria Enter the Bloodstream and Trigger Systemic Inflammation In a patient with active periodontitis, the inner lining of the periodontal pocket is ulcerated. The total surface area of this ulceration across a full dentition with moderate-to-severe periodontitis can reach several square centimetres. Across that surface, subgingival bacteria have direct access to the bloodstream. Bacteremia following tooth brushing, eating, and professional dental treatment is well-documented in patients with untreated periodontal disease. The bacteria entering the circulation are the same pathogens driving the infection in the pocket. The immune response to that bacterial load produces cytokines including interleukin-6 and tumour necrosis factor-alpha. These inflammatory mediators do not stay in the gum tissue. They circulate. C-reactive protein, a non-specific marker of systemic inflammation measured routinely in cardiovascular and metabolic risk assessment, is consistently elevated in patients with untreated periodontitis. A patient with unexplained elevated CRP should have a periodontal assessment as part of that investigation. These two pathways, bacterial seeding through the bloodstream and cytokine-mediated systemic inflammation, are the foundation for every specific organ-level connection that follows. The connections differ in mechanism and evidence strength. The underlying physiology is the same across all of them. Gum Disease and Heart Disease: What the Evidence Shows People with periodontitis have a statistically higher risk of cardiovascular disease and stroke than those without it. The association persists after controlling for shared risk factors including smoking, diabetes, and socioeconomic status. A 2020 analysis of over 8,000 patients in the Journal of Clinical Periodontology found significantly elevated cardiovascular event risk in patients with severe periodontitis. Two mechanisms specific to cardiovascular involvement sit on top of the general bacteremia and inflammation pathways. Periodontal pathogens, particularly Porphyromonas gingivalis, have been identified in atherosclerotic plaques recovered from cardiac patients during procedures. The bacteria are not incidental. The same strains causing periodontal infection are present in the arterial lesions. The second mechanism involves systemic inflammation from periodontal disease contributing to endothelial dysfunction and atherosclerotic plaque instability, the process behind the majority of acute cardiac events. The relationship is extensively associative and the evidence for direct causality in humans is building rather than complete. Cardiologists and periodontists increasingly treat the conditions as connected rather than coincidental. For a patient who has had a cardiac event or carries known cardiovascular risk factors, untreated periodontitis is a modifiable risk factor. Treating it does not guarantee cardiovascular protection. Leaving it untreated is not clinically neutral. Oral Health and Diabetes: A Two-Way Relationship The diabetes-oral health connection is defined by something that makes it different from every other oral-systemic relationship: it runs in both directions simultaneously. Diabetes worsens gum disease. Active gum disease worsens diabetes control. A patient managing one without addressing the other is working against both simultaneously. Diabetes impairs the immune response to periodontal bacteria in specific ways. Elevated blood sugar alters the function of neutrophils. Neutrophils are the immune cells that clear bacterial infections in the gum tissue. The result is more aggressive disease progression at lower bacterial loads than would produce the same severity in a non-diabetic patient. Diabetic patients also have impaired tissue healing, which affects response to periodontal treatment. These factors are why periodontal disease is considered the sixth complication of diabetes in the clinical literature alongside retinopathy, nephropathy, neuropathy, cardiovascular disease, and peripheral vascular disease. The reverse direction is where the clinical implications become most practically significant. Active periodontal infection elevates circulating inflammatory cytokines that interfere with insulin signaling and increase insulin resistance. HbA1c, the primary measure of long-term blood sugar control, is measurably higher in diabetic patients with untreated periodontitis compared to those without it. Treating periodontitis in diabetic patients produces statistically significant improvements in HbA1c. Studies have found reductions of 0.3 to 0.5 percentage points following periodontal treatment, a magnitude comparable in some analyses to adding a second oral hypoglycaemic agent to the treatment regime. In the UAE, where adult diabetes prevalence ranks among the highest globally, this bidirectional relationship carries specific clinical weight. A diabetic patient attending a dental appointment without disclosing their condition is providing incomplete clinical information. Their periodontal assessment, treatment thresholds, and expected healing response all differ from a non-diabetic patient’s, and the management plan should reflect that. Oral Health During Pregnancy: Why Dentists and Obstetricians Both Ask Periodontal disease during pregnancy is associated with preterm birth and low birth weight. The proposed mechanism involves inflammatory mediators, particularly prostaglandin E2, produced in response to periodontal infection that in sufficient concentrations can initiate uterine contractions and cervical ripening. Periodontal pathogens have also been identified in amniotic fluid in cases of preterm birth, providing a plausible direct biological pathway rather than a purely associative connection. Pregnancy changes the oral environment in ways that increase susceptibility to gum disease independently of pre-existing periodontal status. Hormonal changes in the second and third trimesters increase gingival blood flow and produce an exaggerated gum response to bacterial plaque. Bleeding, swelling, and tenderness that develop during pregnancy, sometimes called pregnancy gingivitis, are not normal. They are a clinical finding that warrants assessment and management. Dental treatment during pregnancy is safe and recommended. The second trimester is the preferred window for elective treatment. Avoiding dental care during pregnancy out of concern for the foetus carries its own clinical risk. A pregnant patient with active gum disease has a clinical reason for
Why Tooth Decay Is So Common in the UAE

The UAE has some of the highest rates of dental caries in the world. Studies published by the UAE Ministry of Health and regional dental associations consistently place the country among the global leaders in tooth decay, particularly among children. The reasons extend well beyond brushing habits. High sugar consumption, frequent karak chai, desalinated water with little natural fluoride, heavily air-conditioned environments, and delayed dental visits all shape oral health in ways that are specific to life in the Emirates. No single factor explains the numbers. It is the combination, along with the pace and habits of daily life, that makes tooth decay so common. Understanding why cavities develop here is more useful than generic advice about brushing twice a day. Why Sugar Exposure Matters More Than Quantity The UAE ranks among the highest globally for per capita sugar consumption. The figure from the World Health Organization places UAE sugar intake at more than double the recommended daily limit on average. That statistic covers the obvious sources: soft drinks, sweets, pastries. It doesn’t fully account for how sugar enters the diet in less visible ways. Karak chai, consumed multiple times daily by a significant portion of the population, combines condensed milk, sugar, and tea in a preparation that sits against tooth surfaces for extended periods. The frequency matters as much as the quantity. Each sugar exposure triggers an acid response from oral bacteria that lasts approximately twenty minutes. A patient who drinks karak three times between meals is creating three separate acid cycles on top of their meals. The enamel doesn’t recover between them. Date consumption follows a similar pattern. Dates are nutritionally dense and culturally significant, and the concentrated sugars they carry, combined with their sticky texture and the frequency with which they’re consumed during social occasions and Ramadan, create sustained acid exposure that low-frequency consumption wouldn’t produce. How Abu Dhabi’s Climate and Air Conditioning Affect Oral Health Abu Dhabi’s climate drives indoor air conditioning use at a level that directly affects oral health. Heavily air-conditioned environments reduce ambient humidity significantly. Dry air reduces salivary flow over time, and saliva is the mouth’s primary natural defense against decay: it neutralizes acid, remineralizes enamel, and mechanically clears food debris from tooth surfaces. A patient spending twelve hours daily in air-conditioned offices, vehicles, and homes, while compensating for the heat outside with frequent cold drinks, has a different oral environment from someone in a more temperate climate. The cold drinks themselves are frequently carbonated or sweetened, compounding the salivary and acid exposure problem simultaneously. Why Tooth Decay Rates Are So High Among Children in the UAE The statistics on childhood caries in the UAE are stark. Research published in the International Journal of Dentistry found caries prevalence in UAE preschool children exceeding 70% in some studied populations. A separate study from the UAE University found that children attending government schools had significantly higher decay rates than those in private schools, correlating with socioeconomic factors and dietary patterns rather than access to dental services alone. Early childhood caries in the UAE is driven substantially by bottle feeding practices, specifically prolonged bottle use with sweetened beverages or juice at sleep time, combined with late introduction to dental care. The first dental visit recommendation in the UAE is frequently delayed well beyond the internationally recommended age of one year, which means early decay is often identified only once it has become symptomatic rather than at the preventable stage. How Expat Lifestyles and Diet Increase Cavity Risk The UAE population is roughly 90% expatriate. Dietary transitions that accompany relocation from South Asia, Southeast Asia, the Philippines, and Western countries interact with the local food environment in specific ways. South Asian dietary patterns bring high carbohydrate consumption, frequent snacking, and significant tea consumption with sugar. When those patterns meet the UAE’s food environment, which provides cheap, highly processed food, round-the-clock availability of sweetened beverages, and a social culture built around frequent eating and hospitality, the cariogenic load increases. The other factor is irregular dental attendance. Expatriate workers in the UAE on short-term contracts, particularly lower-income workers whose insurance coverage is limited, frequently delay dental care until symptoms become acute. Decay that would have been a simple filling at the twelve-month mark becomes a root canal or extraction at the two-year mark. The pattern repeats across the working population in a way that inflates the severity of decay in the data alongside its prevalence. Does Abu Dhabi’s Water Contain Fluoride? Water fluoridation at therapeutic levels (0.7 parts per million) has been one of the most cost-effective public health interventions for decay prevention in countries that have implemented it. The UAE relies predominantly on desalinated water, which has negligible natural fluoride content. The desalination process removes essentially all minerals, fluoride included, and the UAE does not fluoridate its municipal water supply at therapeutic levels. This means the passive fluoride protection that residents of fluoridated countries receive through tap water consumption simply isn’t present here. The gap is partially filled by fluoridated toothpaste, but only for the population that uses it consistently and in adequate amounts, which doesn’t include a significant portion of young children whose parents are managing fluoride exposure without guidance. The compounding effect of no water fluoridation, high sugar intake, reduced salivary flow from climate and air conditioning, and irregular dental attendance produces decay rates that exceed what any single factor would explain. How UAE Residents Can Reduce Their Risk of Tooth Decay Decay in the UAE isn’t primarily a brushing problem. A patient who brushes twice daily with fluoride toothpaste but drinks three sweetened beverages between meals, lives in a heavily air-conditioned environment, and hasn’t had a professional cleaning in two years is more decay-prone than a patient who brushes once daily but drinks water between meals, has good salivary flow, and attends regular check-ups. The interventions that move the needle are the unglamorous ones: reducing between-meal sugar exposure, rinsing with water after sweetened drinks, using fluoride toothpaste correctly, staying adequately hydrated to support salivary flow, and attending a check-up at an interval that catches early decay before it becomes symptomatic. Early decay is silent and reversible. The same decay six months later is neither. Professional assessment at Marigold Dental in Abu Dhabi identifies what’s developing before it becomes a treatment rather than a conversation. Questions About Tooth Decay
What Happens During a Dental Check-Up?
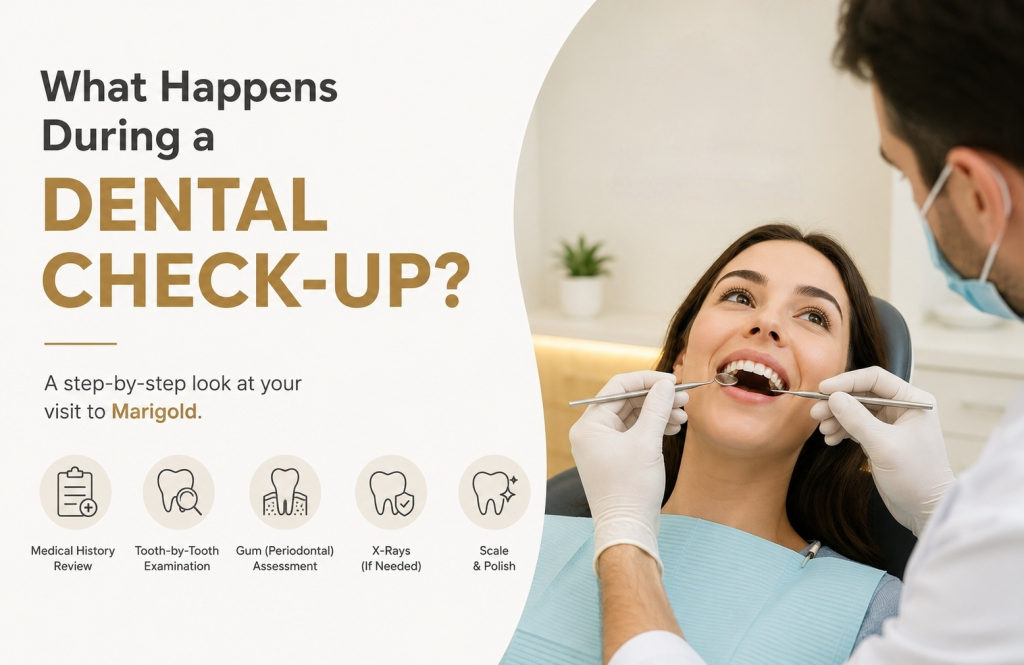
A check-up at Marigold covers six clinical stages: medical history review, full tooth-by-tooth examination, periodontal assessment, soft tissue screening, X-rays where clinically indicated, and a scale and polish. For a new patient the appointment runs 45 to 60 minutes. For an established patient with an existing chart and recent X-rays, closer to 30 to 45. Nothing in the appointment should feel unexpected after reading this. The sequence below follows the order the appointment actually happens. Why a Dentist Asks About Your Medications and Medical History Before the clinical examination begins, a medical history form covers current medications, systemic health conditions, recent surgeries, allergies, and for female patients, pregnancy status. Patients who haven’t been asked these questions at a dental practice before sometimes treat it as administrative routine. It isn’t. Certain medications directly affect what happens in the appointment. Blood thinners change how gum tissue responds to probing and scaling. Bisphosphonates, used for osteoporosis, affect how jaw bone responds to certain procedures and need to be flagged before any extractions or implant work is planned. Immunosuppressants affect healing. Antihistamines and antidepressants reduce saliva production, which increases decay risk in a specific and measurable way. Diabetes changes the periodontal assessment and the follow-up plan. Poorly controlled blood sugar produces more aggressive gum disease progression, and the finding of significant periodontal disease in a patient who hasn’t been diagnosed with diabetes is occasionally the first clinical indicator of the condition. Blood pressure outside normal range affects which local anesthetic is used and in what concentration. A dentist who doesn’t know a patient’s blood pressure before administering anesthetic is treating without complete information. Pregnancy affects which X-rays are taken, which materials are used, and which treatments are deferred to the second trimester or post-partum. The form exists because the answers change what happens next. What a Dentist Examines During a Routine Check-Up Each tooth is examined visually and with a fine metal probe. The probe detects softness in the enamel surface that indicates early decay before it becomes visible, assesses the margins of existing fillings and crowns for breakdown or secondary decay, and identifies cracks and wear that a visual examination alone misses. Existing restorations are checked specifically. A filling placed five years ago may have an intact surface but a failing margin at the gum line. A crown that looks fine from the front may have a dark line developing at the base that warrants investigation. The examination records the current condition of every restoration as a baseline for future comparison. The bite relationship gets assessed separately. How upper and lower teeth meet when the patient closes normally and moves the jaw sideways reveals wear patterns, grinding habits, and occlusal forces that affect both the teeth and the temporomandibular joint. A patient who has been grinding during sleep often shows wear facets on the biting surfaces of their teeth before they report any symptoms. Cold sensitivity testing identifies teeth with pulpal involvement that aren’t yet producing spontaneous pain. A tooth that reacts sharply to cold and takes more than a few seconds to settle is behaving differently from a tooth with normal sensitivity, and that difference gets recorded. All findings go into a dental chart, a tooth-by-tooth record that becomes the baseline against which every future appointment is compared. A first examination at a new practice is more detailed than a recall examination precisely because no baseline exists yet. Gum Pocket Measurement: What It Is and Why It Is Part of Every Check-Up Yes, a check-up includes a gum assessment. At six points around each tooth, a calibrated probe measures the depth of the sulcus, the space between the tooth surface and the surrounding gum tissue. The measurement takes seconds per tooth and the numbers are called out to be recorded. Healthy pockets measure between 1 and 3 millimetres. A reading of 4mm indicates inflammation. Readings of 5mm and above indicate periodontal disease of varying severity depending on whether bone loss is also present on the X-ray. Bleeding when the probe touches the tissue is recorded separately; consistent bleeding indicates active gum inflammation even when the patient reports no pain or visible problem. The Basic Periodontal Examination, or BPE score, summarizes the periodontal status across six sections of the mouth as a single reference code. It’s the number that determines whether a patient needs a standard scale and polish, a more thorough subgingival clean, or a referral for specialist periodontal treatment. In Abu Dhabi, where periodontal disease prevalence is among the highest in the region for reasons covered in detail in Gum Disease: Early Signs Most People Miss, a patient attending a first comprehensive examination without an existing periodontal baseline is at the stage where the assessment is most clinically significant. A pocket depth reading of 5mm with no prior charting doesn’t tell the dentist how long the disease has been present or how quickly it’s progressing. The baseline appointment is where that measurement begins. Soft Tissue Examination and Oral Cancer Screening at a Dental Check-Up A check-up includes a systematic examination of the soft tissues: lips, inner cheeks, tongue, floor of the mouth, palate, and the back of the throat. The examination is visual and tactile, conducted with gloved hands and a mouth mirror, and takes two to three minutes. The dentist is looking for asymmetry, discoloration, ulceration that hasn’t resolved within two weeks, unusual surface texture, and any lump or thickening that doesn’t correspond to normal anatomy. Oral cancer identified at stage one carries a survival rate above 80%. Identified at stage four, below 20%. The examination costs two minutes of the appointment. The finding it produces, when there is one, changes the outcome significantly. Tobacco use, regular alcohol consumption, and HPV exposure are the primary risk factors, but the examination is conducted for every patient regardless of perceived risk because a significant proportion of oral cancer diagnoses occur in patients without obvious risk factors. Anything that warrants further investigation is referred. The dental examination is not a diagnostic procedure.
How to Choose a Dentist in Abu Dhabi

Every dental clinic website in Abu Dhabi says roughly the same things. Experienced team. State-of-the-art technology. Gentle, patient-centered care. After the third or fourth one, the words stop meaning anything. The problem isn’t that these claims are false. It’s that they’re unverifiable from the outside, and they tell you nothing about the things that actually determine whether a practice is worth your trust: how clearly the dentist communicates, whether the treatment plan you receive reflects what you need or what generates revenue, whether the fee discussed on the phone is the fee on the invoice. None of that appears on a website. Choosing a dentist well in Abu Dhabi requires looking past the surface claims toward the signals that are harder to fake. This piece is about what those signals are and where to find them. What Dentist Qualifications Actually Mean in Abu Dhabi In Abu Dhabi, dental practitioners are licensed by the Department of Health. That license is publicly verifiable and worth checking. It confirms a practitioner has met the baseline standard to practice here. It doesn’t tell you much beyond that. Postgraduate specialist registration is a different credential. A dentist who has completed a specialty program in orthodontics, periodontics, or oral surgery holds a qualification that reflects years of additional clinical training in a specific discipline. A general dentist who has attended orthodontic continuing education courses does not hold the same qualification, even if both practitioners offer similar treatments. When the treatment you need sits in specialist territory, that gap is clinically relevant. How a clinic structures its clinical team says something specific. A practice that employs specialists for treatments that fall within their specialty has made a deliberate decision about clinical quality. It won’t appear anywhere in the marketing copy. It shows up in who is actually treating you and what their background in that specific area is. A dentist who completed their training fifteen years ago and has continued engaging with the evidence base is a different practitioner from one who hasn’t. It’s a reasonable question to ask directly at a first appointment, and the ease with which it’s answered tells you something too. How to Read a Dental Clinic Before Your First Appointment The phone call before the first appointment isn’t a booking formality. It’s the first piece of clinical culture a patient encounters, and it’s more revealing than anything on the website. Fee deflection is a specific signal. The response that costs depend on what’s found at examination is reasonable for complex treatment planning. A check-up, a scale and polish, a standard filling: these have ranges, and a practice comfortable sharing them without hesitation is operating differently from one that redirects every cost question toward the appointment. Insurance navigation in Abu Dhabi is genuinely complex. Thiqa, Daman, AXA, ADNIC, NAS, and Neuron UAE carry different coverage structures, pre-authorization requirements, and claim processes that vary enough to create real administrative friction. A clinic handling that coordination internally, rather than routing patients through it themselves, has made a deliberate investment in patient experience. Whether that investment exists is apparent from the first conversation about coverage. The front desk isn’t separate from the clinical experience. A team that answers specific questions with specific answers, stays unhurried, and meets uncertainty with information rather than a script reflects a culture that doesn’t stop at reception. What Should Actually Happen at a First Dental Appointment A thorough examination covers teeth, gums, bite, soft tissues, and diagnostic X-rays where the clinical picture warrants them. That’s the baseline. What follows it is where the quality of a practice actually shows. Findings should be explained in terms that land rather than impress. What was found, what it means clinically, what the options are including doing nothing or monitoring, and what each option produces over time. A patient leaving without that conversation has been examined. They haven’t been consulted. Treatment plans warrant the same standard. A specific treatment, the clinical reason behind it, and the cost: presented as a connected explanation rather than a number at the bottom of a form. The number without the reasoning is where confidence in a recommendation erodes, and reasonably so. A first appointment that leaves room for questions, answers them directly, and doesn’t redirect every uncertainty toward booking is practicing in a way that produces better information for both sides of the consultation. Red Flags When Choosing a Dentist in Abu Dhabi Trustworthy practices are partly defined by what they don’t do. The following aren’t edge cases. They’re the patterns behind the reviews that say “felt pressured” or “ended up somewhere else.” A significant treatment recommendation at a first appointment without visible clinical reasoning behind it deserves a direct question: what specifically did you find, and what does it show? The finding might be entirely legitimate. A recommendation that arrives without the reasoning attached is one the patient has no basis for evaluating, and that gap is where unnecessary treatment enters the picture regardless of intention. Booking pressure at the end of an appointment is a different thing from clinical urgency. Genuine clinical urgency comes with an explanation of what happens if treatment is delayed. A prompt to book before leaving that doesn’t come with that explanation is a conversion mechanic, not a clinical one. Fee changes between the quote and the invoice warrant an explanation before checkout, not after. Additional findings that change the scope of treatment happen in clinical practice. A practice that communicates them before proceeding is handling it appropriately. A written treatment plan with itemized costs creates accountability on both sides of the consultation. Resistance to producing one, or producing one only after the patient asks twice, is worth noting. On second opinions: a patient asking for one isn’t questioning the dentist’s competence. It’s a reasonable thing to do before committing to significant treatment, and a clinician who responds with anything other than straightforward support for it is signaling something worth paying attention to. What Makes Choosing a Dentist in Abu Dhabi Specifically Difficult Abu Dhabi’s dental market is large, diverse, and variable in quality in ways that aren’t readable from the outside. The same clinic tier, same fee range, same Google rating can produce very different clinical experiences depending on factors the search results don’t surface. Language is one of them. A patient who communicates in a shared first language with their dentist gives more accurate clinical history and receives more useful explanations. The difference between a consultation conducted comfortably and one navigated through partial comprehension affects the quality of the diagnosis discussion and how confidently the patient can ask the questions that matter. A
Dental Implant Cost in Abu Dhabi Explained

A single dental implant in Abu Dhabi costs between AED 3,500 and AED 12,000. That range isn’t imprecision. It reflects genuinely different clinical situations, different materials, and different amounts of work. Two patients sitting in the same waiting room on the same day can leave with quotes that differ by AED 6,000, both of them accurate. What determines where a specific case lands in that range is what this piece covers. What a Single Implant Actually Consists Of An implant is three separate components, not one. Understanding that changes how a quote reads. The implant post is a titanium fixture placed surgically into the jawbone. Over three to six months, bone grows around it in a process called osseointegration. The post brand matters here in a specific way: established implant systems from manufacturers with extensive clinical research behind them, Nobel Biocare, Straumann, Osstem among the most widely used in Abu Dhabi, carry different price points and different documented survival rates. That gap between systems is clinically significant, not cosmetic. The abutment connects the post to the crown above it. Its fit at the gum line affects both aesthetics and long-term tissue health around the restoration. A poorly fitted abutment creates marginal gaps. Those gaps accumulate bacteria. The crown is the visible tooth. Material selection follows the same clinical logic as any crown decision: zirconia performs differently from E-Max, which performs differently from PFM, depending on the tooth’s position, the bite load it carries, and what the aesthetic requirements are. The crown material component of an implant quote is explained in detail in [Different Types of Dental Crowns Explained](link to crowns blog). Why Two Quotes for the Same Treatment Can Differ by Thousands Five variables drive most of the variation. Implant system. The post itself varies in price depending on manufacturer, surface treatment technology, and the clinical data supporting it. A system with twenty-year survival data costs more than one without it. That difference is what the price gap between a AED 3,500 quote and an AED 8,000 quote frequently reflects. Crown material. Zirconia, E-Max, and PFM sit at different price points. The clinically indicated material depends on the tooth’s position and functional demand, not on which option is cheaper. Placement complexity. A straightforward posterior implant into adequate bone is a different procedure from an anterior implant where positioning precision, soft tissue management, and aesthetic outcome all require additional planning and clinical time. Imaging. Cone beam CT scanning provides the three-dimensional bone map needed for accurate placement. Some clinics include it in the quoted figure. Others price it separately. A quote without imaging specified warrants a direct question. Surgeon experience. An oral surgeon or periodontist with a dedicated implant practice has a different fee structure from a general dentist placing occasional cases. That difference reflects training depth, case volume, and the complication management that concentrated experience builds. When the Quote Gets More Complex A patient who lost a tooth a year ago and didn’t replace it has likely experienced some degree of bone resorption at that site. The jaw requires stimulation from a tooth root to maintain its density. Without it, bone volume reduces progressively, as covered specifically in [Dental Implants vs Dentures: A Long-Term Solution Comparison](link to implants vs dentures blog). When remaining bone volume is insufficient for implant placement, grafting is required. Socket preservation after extraction, ridge augmentation for significant bone loss, sinus lifting for upper posterior implants: each adds to the total cost and extends the treatment timeline. A quote that includes bone grafting isn’t a more expensive clinic. It’s a more honest assessment of what the case actually requires. A quote that doesn’t mention grafting for a site with documented resorption is worth questioning directly. How to Read an Implant Quote A detailed quote specifies the implant system by name, the crown material, whether imaging is included, the number of appointments covered, and whether a bone assessment has been done. A single number without that breakdown isn’t enough information to evaluate. Four questions worth asking before accepting any quote: The Longer View on Cost The upfront figure is higher than alternatives. Across ten to twenty years, the comparison shifts. Dentures require relining, eventual replacement, and the bone loss that continues beneath them compounds the clinical situation progressively. An implant placed now into adequate bone is a different economic proposition from one placed after years of resorption have required grafting to make it viable. The grafting cost, the extended timeline, and the increased complexity all reflect what the delay produced. Insurance coverage varies considerably by plan. Thiqa, Daman, AXA, ADNIC, and NAS each have different structures for implant components. Confirming what applies before treatment planning is practical rather than optional. What a Phone Quote Can’t Tell You A phone quote is a range. A clinical assessment with imaging, bone evaluation, and a specific treatment plan is an actual number for an actual case. The distance between the two is the clinical picture of the patient’s specific situation. A dental implant consultation at Marigold Dental Abu Dhabi covers the full picture: imaging, bone assessment, component specification, and a detailed quote. That’s where the range becomes specific. Questions Patients Ask Why do implant quotes in Abu Dhabi vary so much? The implant system, crown material, whether imaging is included, bone grafting requirements, and the clinician’s experience level all contribute independently. Two quotes can differ by thousands of dirhams while describing clinically different treatments. Does UAE insurance cover dental implants? Coverage varies by plan and provider. Some plans cover partial costs of specific components. Confirming with the insurer before treatment planning gives a clearer picture of the actual out-of-pocket figure. What if there isn’t enough bone for an implant? Bone grafting restores the volume needed for placement in most cases. The type required depends on the extent of resorption. It adds to the timeline and cost but makes placement possible in sites that wouldn’t otherwise support it. How long does the full process take? Three to six months from placement to final crown in straightforward cases. Cases requiring grafting beforehand add three to six months. The timeline reflects osseointegration, not appointment frequency.
Deep Cleaning vs Regular Teeth Cleaning Guide
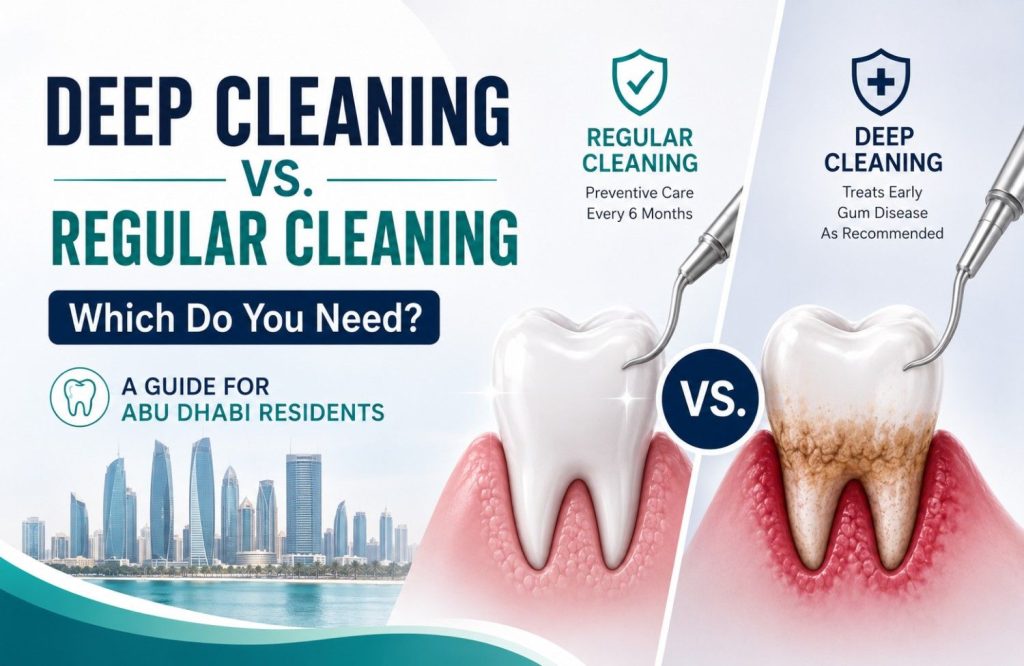
Introduction: Why This Matters More Than You Think If you’ve booked a dental appointment in Abu Dhabi recently, you may have been surprised to hear your dentist recommend a “deep cleaning” instead of the routine cleaning you were expecting. For many patients, this raises an immediate question: what’s the difference, and why does it cost more or take longer? This isn’t just a matter of terminology. Choosing between a regular teeth cleaning service and a deep cleaning treatment can directly affect your gum health, the longevity of your teeth, and even your overall health — since untreated gum disease has been linked to heart disease, diabetes complications, and respiratory issues. Abu Dhabi’s climate, dietary habits (including high tea and coffee consumption), and lifestyle factors also mean that gum health issues can develop gradually without residents realizing it. Understanding which type of cleaning your teeth actually need helps you avoid two common mistakes: paying for a deep cleaning you don’t need, or delaying treatment your gums genuinely require. This guide breaks down both procedures in plain language, so you can walk into your next appointment at a dental clinic in Abu Dhabi with confidence. 1. What Is Regular Teeth Cleaning? Regular cleaning — also called prophylaxis — is the routine teeth cleaning service most people are familiar with. It’s designed for patients with generally healthy gums and is typically recommended every six months as part of standard preventive dental care. What Happens During a Regular Cleaning Who Regular Cleaning Is For Regular cleaning is appropriate if: 2. What Is Deep Cleaning (Scaling and Root Planing)? Deep cleaning, clinically known as scaling and root planing (SRP), is a more intensive procedure used when plaque and tartar have built up below the gumline, causing early to moderate gum disease (periodontitis). What Happens During Deep Cleaning Who Needs Deep Cleaning Your dentist may recommend deep cleaning if you show: 3. Key Differences: Deep Cleaning vs. Regular Cleaning Aspect Regular Cleaning Deep Cleaning Target area Above the gumline Above and below the gumline Purpose Preventive maintenance Treating early gum disease Number of visits Usually one Often two (upper/lower or quadrant-based) Anesthesia Not required Local anesthesia typically used Recovery time None Mild soreness for 1–2 days Frequency Every 6 months As recommended, then maintenance cleanings The core distinction comes down to gum pocket depth and the presence of periodontal disease. Your dentist will use a periodontal probe to measure pocket depth around each tooth — this single measurement usually determines which category of teeth cleaning service applies to you. 4. How to Know Which One You Need You don’t have to guess. Here are the signs that typically point toward each option: Signs You Likely Need Regular Cleaning Signs You May Need Deep Cleaning If you’re unsure, the safest step is a dental checkup where pocket depths can be measured. Many Abu Dhabi dental clinics, including Marigold Dental, offer a comprehensive oral assessment before recommending either procedure, so you aren’t paying for treatment you don’t need. 5. What Happens If You Skip the Cleaning You Actually Need Choosing the wrong path or avoiding treatment altogether carries real consequences: If You Skip Deep Cleaning When You Need It Untreated gum disease progresses in stages. Early gingivitis can advance to periodontitis, where the supporting bone around teeth begins to break down. This can eventually lead to tooth loss and has been associated with increased risk for cardiovascular issues. If You Get Deep Cleaning When You Only Needed Regular Cleaning This is less harmful but still worth avoiding — it means unnecessary cost and a longer, more uncomfortable procedure than your gums actually required. This is exactly why an accurate diagnosis matters more than defaulting to the more “thorough-sounding” option. Practical example: A patient in Yas Island who ignored early gum bleeding for over a year returned to find pocket depths had progressed from 3mm to 5mm, requiring not just deep cleaning but a follow-up periodontal maintenance plan every three months instead of the standard six. Conclusion: Your Next Step The difference between deep cleaning and regular cleaning isn’t about which sounds more serious — it’s about what your gums specifically need, based on pocket depth, plaque location, and signs of gum disease. Regular cleaning maintains healthy gums; deep cleaning treats early gum disease before it progresses further. If you’re unsure which category applies to you, the best next step is a professional dental assessment rather than guessing based on symptoms alone. A qualified dental hygienist can measure your gum pockets in minutes and recommend the right teeth cleaning service for your specific situation — whether that’s a routine six-month cleaning or a more targeted scaling and root planing treatment. Ready to find out which cleaning your teeth need? Book a dental assessment with Marigold Dental and orthodontist service in Abu Dhabi and get a clear, personalized recommendation from an experienced dental team.
Root Canal vs Tooth Extraction: Which Is Better?
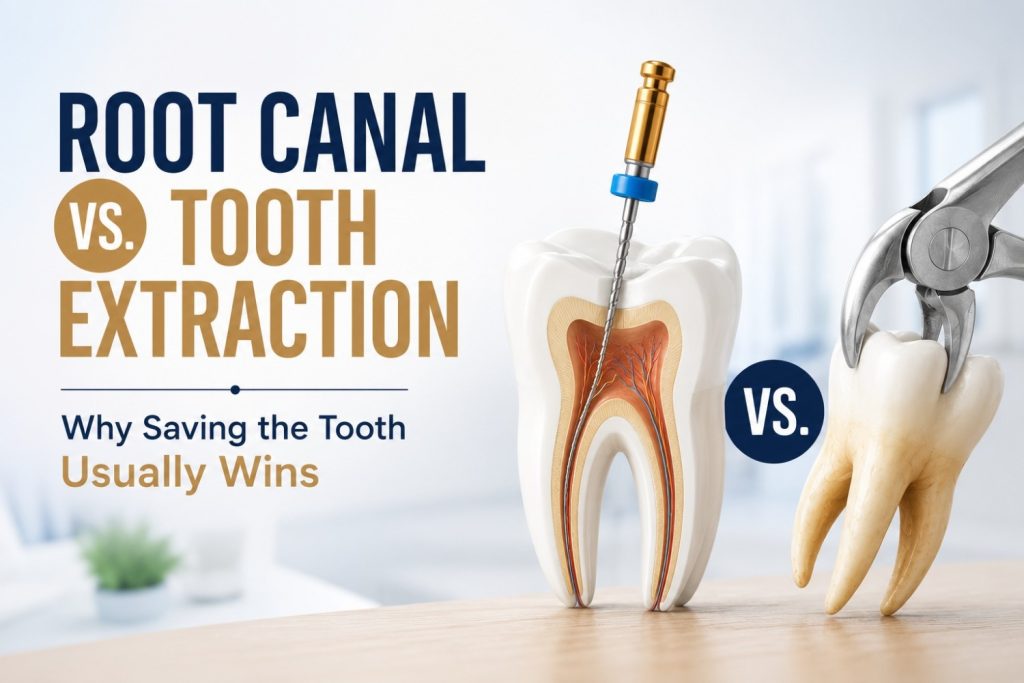
Your dentist just said the words no one wants to hear: “this tooth needs a root canal, or we take it out.” Suddenly you’re standing at a fork in the road, and the extraction sounds faster, cheaper, and simpler. Before you decide, here’s what that choice actually means for your mouth and your wallet years from now. Why Extraction Feels Like the “Easy” Choice (But Isn’t Always) It’s easy to see why extraction sounds appealing. It’s often quicker, and on paper, it looks cheaper than a root canal. That part is true, in the moment. But here’s what that upfront price tag doesn’t include: a missing tooth almost always needs to be replaced. Leave a gap too long and neighboring teeth start to shift, your bite changes, and the jawbone underneath actually begins to shrink from lack of use. So the “simple” option quietly turns into a second, third, or fourth decision down the line an implant, a bridge, or a denture. Add all of that up, and extraction is frequently the more expensive path, not the cheaper one. What a Root Canal Actually Saves You From A root canal isn’t just about fixing pain it’s about keeping everything your tooth is already doing for you intact.That’s the core idea behind root canal treatment in Abu Dhabi preserving what’s already there rather than replacing it. Your natural root stays in place, your jawbone keeps its normal density, and nothing artificial needs to be built to replace it. It also protects you from the domino effect that comes with losing a tooth: neighboring teeth drifting into the gap, your bite gradually shifting, and bone loss that gets harder to reverse the longer it goes untreated. And for what it’s worth modern root canals are nowhere near as painful as their reputation suggests. Most patients say the anxiety beforehand was worse than the procedure itself. The Real Cost Comparison Root Canal + Crown vs. Extraction + Replacement Let’s talk numbers, because this is usually what tips the decision. The “savings” from extraction tend to disappear the moment you need a replacement tooth, which, realistically, most people do. Is It Better to Save a Tooth or Get a Root Canal? In most cases, it’s better to save a natural tooth with a root canal than to extract it. Root canals preserve jawbone density, prevent teeth from shifting, and are usually more cost-effective long-term than extraction followed by an implant or bridge. That said, it’s not a blanket rule. Extraction is still the right call when a tooth is severely fractured, has significant bone loss around it, or simply can’t structurally support a crown afterward. The right answer always comes down to the specific tooth in question which is exactly why a proper exam matters more than any general guideline. When Extraction Genuinely Is the Better Option To be clear, root canal isn’t the answer for every situation, and a good dentist will tell you that honestly. Extraction tends to be the better choice when: A clinic that’s upfront about when extraction makes more sense is one you can trust to give you the right answer for your specific situation not just the answer that fills a treatment slot. The Bottom Line The truth is, this isn’t a decision to make from a search engine. It depends on your specific tooth, your bone health, and what you want for your smile long-term. A quick exam can tell you which path actually makes sense for you, before you commit to either one. Not sure which option is right for your tooth? Book a consultation at Marigold Dental & Orthodontic Clinic in Abu Dhabi and get a clear, honest recommendation no pressure either way.
When Should a Child See an Orthodontist
Your child’s dentist just casually mentioned “age 7” at their last cleaning — and you left the appointment wondering if that’s way too early to think about braces, or if you’re already behind. You’re not alone. Most parents assume orthodontics starts in the teen years. Here’s why that’s not quite right, and what age 7 actually means for your child. Why Age 7 Is the “Magic Number” By around age 7, your child usually has a mix of baby teeth and permanent teeth — just enough for an orthodontist to get a real look at how the bite and jaw are developing. It’s not too early, and it’s definitely not random. At this age, the jaw is still soft and growing, which means small issues are much easier to guide now than to correct later. And here’s the part that surprises most parents: this first visit isn’t a commitment to treatment. In most cases, the orthodontist simply takes a look, maybe schedules a follow-up in six months to a year, and that’s it. Signs You Shouldn’t Wait For You don’t have to wait until exactly age 7 if something feels off sooner. A few things worth mentioning to your dentist right away: None of these automatically mean treatment is needed. But they’re worth a professional look rather than a “let’s just wait and see.” Thumb-Sucking Harmless Habit or Bigger Problem? Every parent has been there. And honestly, thumb-sucking and pacifier use are completely normal up to about age 3 or 4. The concern only kicks in if the habit sticks around longer than that, especially once permanent teeth start coming in. Here’s why: prolonged sucking habits can gradually reshape the roof of the mouth and push the front teeth forward. The good news is this isn’t scary or permanent. Orthodontists usually start with simple behavioral fixes, and only move to a small habit-breaker appliance if the habit has already started affecting the bite. What’s the Difference Between Phase 1 and Phase 2 Orthodontic Treatment? Phase 1 orthodontic treatment happens around ages 7–10 and focuses on guiding jaw growth and creating space for adult teeth. Phase 2 begins once most permanent teeth have erupted, usually around ages 11–13, and uses braces or aligners to fully align the smile. The two phases work together but serve different jobs. Phase 1 is about setting up the jaw and making room not creating a perfect smile yet. Phase 2 is the stage most people picture when they hear “getting braces,” where teeth are brought into their final position. Worth repeating: not every child needs both. Plenty of kids get checked at age 7, get the all-clear, and go straight to a single round of braces once their adult teeth are all in. What Actually Happens at the First Visit If you’re picturing X-rays, appliances, and a treatment plan on day one relax. A first orthodontic visit is usually quick and low-key. It’s a visual exam, an X-ray only if something needs a closer look, and a conversation about anything you’ve noticed at home. Most of the time, the visit ends with “let’s just keep an eye on this” rather than an immediate plan. There’s no pressure, no stress for your child, and definitely no obligation. The Bottom Line There’s really no downside to an early orthodontic check and for some kids, it opens up options that simply won’t be there a few years down the line. If your child is around age 7, or you’ve noticed any of the signs above, it’s worth a quick look now rather than waiting. Book a free early orthodontic screening for your child at Marigold Dental & Orthodontic Clinic in Abu Dhabi no pressure, just peace of mind.
Orthodontic Emergencies: Broken Bracket Fix
Orthodontic treatment does a lot of quiet, steady work behind the scenes — nudging teeth into place day after day. But every so often, something shifts, snaps, or pokes where it shouldn’t, and suddenly you’re not sure if you need to rush to the clinic or just ride it out until your next appointment. The good news: most orthodontic issues are minor and manageable at home. A smaller number need same-day attention. Knowing the difference can save you a lot of unnecessary worry — and protect your treatment progress. Is It Actually an Emergency? Not every braces problem is urgent. Before you panic, it helps to sort the issue into one of two buckets. Can usually wait for a scheduled visit: Needs prompt attention (call your orthodontist): If you’re ever unsure which bucket you’re in, it’s always safer to call the clinic and describe what’s happening rather than guess. A Wire Is Poking My Cheek — What Do I Do? This is one of the most common braces complaints, and it’s usually easy to manage temporarily at home. What not to do: avoid cutting the wire yourself with scissors or nail clippers. It’s easy to clip off a piece that gets swallowed or inhaled, and it doesn’t fix the underlying issue. A Bracket Has Come Loose or Broken Off If a bracket is still attached to the wire but has slid out of place, it’s usually not urgent — you can cover any sharp edge with wax and book a repair appointment. If it’s fully detached and loose in your mouth: A single loose bracket rarely derails your treatment plan, but leaving it unaddressed for too long can allow the tooth to drift, which may slow your progress. This is one reason your orthodontist chooses the type of braces best suited to your bite in the first place — some brackets are simply more prone to this than others. General Soreness After an Adjustment Some tenderness for two to three days after a tightening is completely normal — it means the braces are doing their job. This isn’t an emergency. To manage it: When to Call the Clinic Immediately Some situations shouldn’t wait, even a day: If any of these happen, contact your orthodontist right away rather than waiting for a routine appointment. Your At-Home Orthodontic Emergency Kit Keeping a small kit on hand makes these situations far less stressful: How to Prevent Braces Emergencies in the First Place A little caution goes a long way in avoiding these situations altogether: The Bottom Line Most orthodontic hiccups — a poking wire, a loose bracket, some post-adjustment soreness — are common, manageable, and not a sign that anything has gone wrong with your treatment. A little wax, a warm salt rinse, and a phone call to your clinic will usually sort things out. Save the genuine urgency for injuries, real pain, or swelling. If something about your braces feels off and you’re not sure what to do, don’t wait it out in discomfort — reach out to our orthodontic team. We’re always happy to talk you through it or get you in for a quick fix.
what Happens If an Infected Tooth Is Left Untreated?
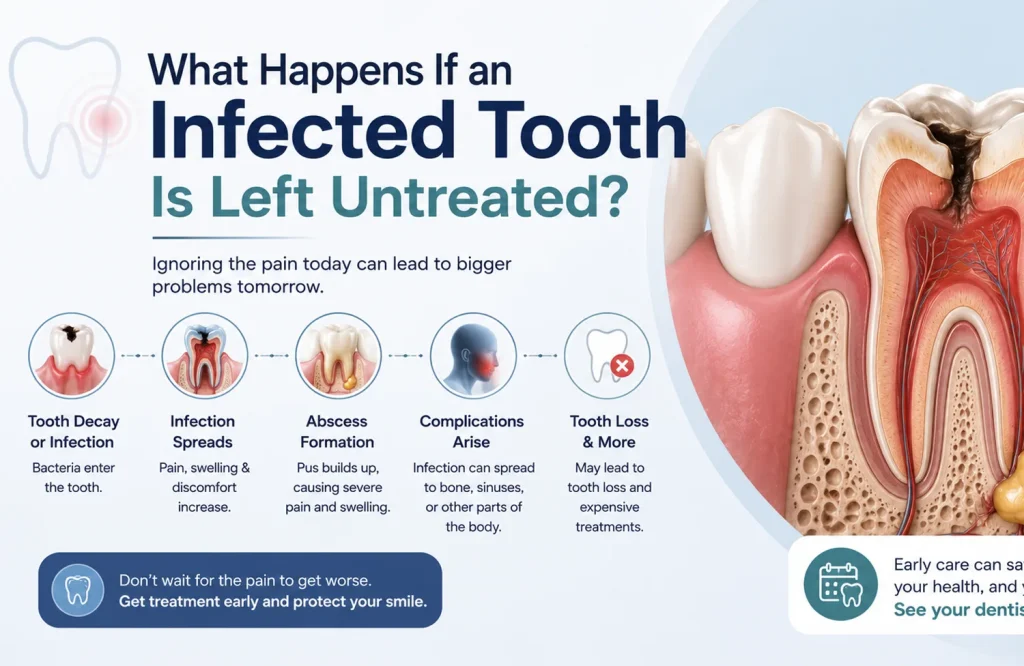
The immune system manages a dental infection at its edges. It doesn’t clear it at the source, because the source is inside a structure with limited blood supply that prevents antibiotics and immune cells from reaching it in sufficient concentration. Without mechanical removal of the infected tissue, the infection doesn’t stabilize. It moves. Where it moves, and how fast, follows a sequence that’s specific and well-documented. Most patients who delay treatment do so during a period when symptoms have quieted. Understanding what is happening to the tooth and the surrounding bone during that quiet period is what this blog covers. From Decay to Infection: How the Pulp Gets Involved Bacteria reach the pulp through deep decay that has gone untreated long enough to penetrate the enamel and dentin, through a crack that provides direct access to the inner tooth structure, or through trauma that disrupts the tooth’s vascular supply without visible external damage. The pulp chamber is an enclosed space. Blood supply enters and exits through a narrow opening at the root tip. That anatomical constraint limits what the immune system can do once infection establishes inside it. The immune response that clears most infections requires adequate blood flow to deliver white blood cells and, where antibiotics are used, sufficient drug concentration at the site. The pulp’s restricted vascularity means neither arrives in the quantities needed to clear a bacterial load that has established and is multiplying in an enclosed environment. A skin abscess can be walled off, drained, and eventually cleared because the surrounding tissue has sufficient blood supply to support that process. The pulp chamber doesn’t have the equivalent. Inflammation builds pressure inside a sealed space, which produces the acute pain of pulpitis. The bacteria, without removal of the tissue they’ve colonized, have a single direction available to them. When the Pain Stops, the Infection Hasn’t Acute pulpitis produces the severe, often throbbing pain that sends patients to emergency dental appointments. That pain comes from inflamed, infected pulp tissue with an intact nerve supply. When the infection progresses to the point of complete pulp necrosis, the nerve fibers within the pulp die along with the tissue. The pain stops. The bacteria that caused the necrosis are still present, now inside a chamber full of dead tissue that provides an ideal bacterial environment: warm, nutrient-rich, and sealed from immune activity. The infection doesn’t pause when the pain resolves. It advances through the root canal and out through the apex into the periapical bone. Patients who experience several days of severe tooth pain followed by gradual resolution frequently conclude the infection cleared on its own. The pain cleared. The nerve that was generating it died. The infection is now progressing through bone, which has no equivalent nerve supply to signal what’s happening. That silent phase, between nerve death and the point where infection reaches soft tissue and produces new symptoms, is the period during which the most clinically significant progression occurs and during which most treatment delays happen. Pain returns when the infection reaches structures with intact nerve supply or when abscess pressure builds sufficiently to produce symptoms at the surface. By that point, the infection is no longer within the tooth. What Develops When Infection Reaches the Bone Infection spreading through the root apex into surrounding bone triggers an immune response: white blood cells move to the site, pus accumulates, and a periapical abscess begins to form at the root tip. The abscess is the body’s attempt to contain bacteria it can’t eliminate. The source of those bacteria, the necrotic pulp above, is unchanged. What happens next depends on whether the abscess finds a drainage pathway. Without one, pressure builds. The abscess expands, erodes through bone, and migrates through soft tissue toward the surface along the path of least resistance. The pain at this stage is acute and pressure-driven: a pulsating, escalating discomfort that distinguishes an expanding abscess from the diffuse ache of earlier infection stages. Facial or gum swelling that appeared relatively quickly, feels firm and tender, and is associated with a specific tooth is the presentation most patients recognize and act on. With a drainage pathway, the abscess forms a sinus tract: a narrow channel through bone and gum tissue that opens on the gum surface as a small pimple-like lesion. The drainage releases pressure. The pain that would otherwise have escalated doesn’t. Patients who notice the lesion often don’t connect it to the tooth; those who do frequently interpret the drainage as the infection clearing. A salty or unpleasant taste when the fistula releases is the most specific patient-detectable indicator. The infection source in the pulp is still present. The fistula is the route by which bacterial products are leaving, not the route by which the infection is resolving. The clinical significance of the two presentations is the same. An abscess that is draining isn’t less serious than one building pressure. The pressure signal that would have driven the patient to seek care has been relieved. The infection continues at the source. Why Antibiotics Manage the Spread but Don’t Treat the Infection Patients prescribed antibiotics for a dental infection who experience symptom improvement within a few days frequently conclude the infection has been treated. The improvement is genuine. The infection source is unchanged. Antibiotics reach infection sites through the bloodstream. Their effectiveness depends on blood supply delivering sufficient drug concentration to the site. A necrotic pulp chamber and an established periapical abscess both have severely restricted vascularity. Antibiotic concentration at those sites reaches a fraction of what arrives at a well-vascularized infection. Enough to reduce systemic bacterial spread and manage the acute inflammation at the infection margins. Not enough to clear the bacterial load within the necrotic tissue or the abscess cavity. Swelling reduces. Fever comes down. The acute pain associated with spreading inflammation settles. The patient feels considerably better within two to three days of starting antibiotics. The bacteria within the necrotic pulp and the abscess are suppressed rather than eliminated. When the course ends, the source remains. The infection re-establishes from the same site, now potentially involving strains that survived the antibiotic exposure. Repeated courses follow the same pattern: symptomatic improvement during each course, re-establishment when it ends, progressive antibiotic resistance risk with each cycle, and continued infection progression at the source level between courses. The tooth’s clinical situation worsens incrementally through